
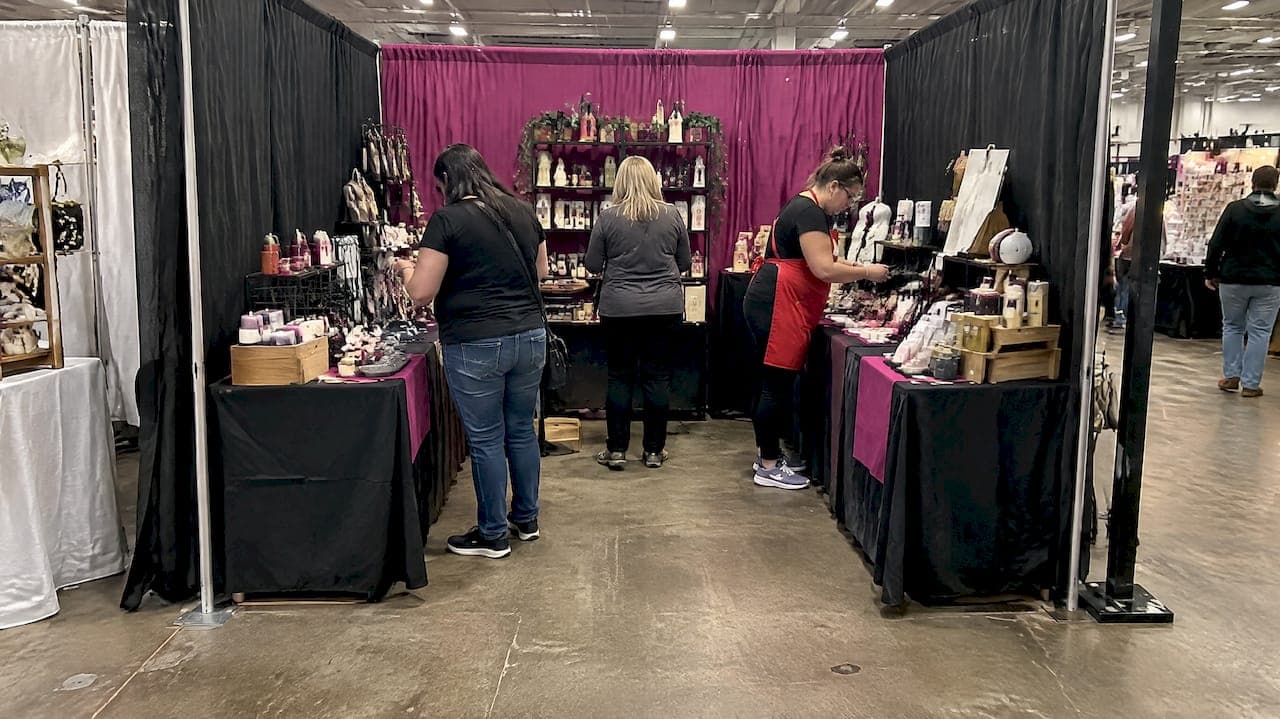
Set a tested 10x10 layout, build a focal zone at 50 to 60 inches for your hero pieces, stack height with risers, tag every price in plain sight, and anchor your canopy before you touch a single product box. Give yourself 60 to 90 minutes for the full build. Before you open, do one thing: confirm your weights are strapped to the frame, not just sitting on the feet.
TL;DR:
- Match a U, L, or walk in floor plan to your products; place the hero item 50 to 60 inches high, away from the entrance.
- Limit the front display to three to five bestsellers, use risers to break up flat surfaces, and label every price clearly.
- Strap ballast to the canopy frame, then check venue rules for staking, required permits or anchoring plans, and electrical equipment.
- For adult themed products, create a partial privacy corner, keep touched samples separate from sellable stock, and offer brief demonstrations only by invitation.
- Secure the canopy and weights within the first 30 minutes, then stock, price, and light the display by minute 60 before checking it from the aisle.
Table of Contents
- Three 10x10 layout templates you can copy today
- Display techniques that turn a glance into a sale
- Branding and lighting that read from the aisle
- Shopper flow and where checkout actually belongs
- Safety and compliance basics before you open
- Your event-day checklist and setup timeline
- Vendor photos that win applications and drive sales
- Test your layout before the event, not during it
- Choosing materials and fabrics for an adult-themed booth
- Privacy and discreet space within your booth
- Interactive elements that work for adult audiences
- Talking with customers about adult products
- Using tablets and screens safely in your booth
- Checking event rules for adult business presentations
- What actually matters once the booth is built
- Promote your booth and listings beyond market day
- FAQ
- Sources
Three 10x10 layout templates you can copy today
We don't believe in reinventing your floor plan every weekend. Pick one of these three shapes, adjust for your product mix, and move on.
- U-shape: Tables line three sides, leaving the back open for you to work and restock. This fits vendors with a wide product range (soap makers, jewelry sellers) who need shoppers to browse from multiple angles without crowding one table.
- L-shape: Two walls of display meet at a corner, freeing the rest of the booth for a sitting or demo area. This works well if you do live demonstrations, hand-pour candles, or need room to talk one-on-one with a customer.
- Walk-in: Shelving or racks run along the back and sides, inviting shoppers to step fully inside your booth. This suits apparel, prints, or anything shoppers want to touch and compare before buying.
Inside any of these shapes, think in zones. Put your hero item, the piece that stops foot traffic, dead center at eye level. Mid-range products flank it on either side, priced to feel like an easy upgrade once someone's already holding their wallet out. Impulse items (stickers, small candles, mini versions of your bestseller) belong at the front edge, within arm's reach of someone who hasn't even stepped in yet.
Checkout goes at the natural exit point, usually the right side if your layout pushes shoppers that direction, never blocking the entrance.
For packing, each template needs roughly the same bones: two 6-foot folding tables or one plus a shelving unit, a slatwall or grid panel for vertical hanging, two to three riser boxes or crates, a rolling rack if you're doing apparel, and your canopy with full ballast. Pack the walk-in template's shelving unit first since it takes the longest to assemble.
Display techniques that turn a glance into a sale
Height does the heavy lifting in a flat booth. A table that's all one level reads as a blur from ten feet away. Varying height, using risers, tiered stands, or a slatwall that runs vertical, breaks up that blur and gives the eye somewhere to land.
That landing spot should be your hero product, placed at 50 to 60 inches off the ground, roughly chest to eye level for most adults walking by. This is the item that represents your brand at its best, whether that's your most popular design or the piece with the richest color or texture.
Resist the urge to put everything you've ever made on the table. A booth stuffed edge to edge invites decision fatigue, and a shopper who can't decide usually decides to walk away. A tighter, curated front row that highlights three to five bestsellers converts better than a table buried in options.
- Use risers or small crates to lift smaller items above the table's flat plane.
- Hang jewelry or accessories on hooks or a bust form so pieces are visible without being handled first.
- Label every price clearly and consistently so shoppers never have to ask.
- Keep a clean "reset" habit, refolding or restocking every 15 to 20 minutes so the display always looks untouched.
Pro Tip: Place your hero item slightly back from the front edge, not right at the lip of the table, so shoppers have to step in to reach it, pulling their attention toward everything else on the way.
Branding and lighting that read from the aisle
A shopper decides whether to approach your booth from 10 to 15 feet away, often while walking. That means your signage has to work at a glance, not up close.
- Put your business name on a banner at the top of your booth, large enough to read from the aisle, with high contrast (dark text on light background or vice versa).
- Keep a secondary sign for pricing or a tagline, but don't compete with the main banner for attention.
- Size your backdrop to your canopy's back wall, usually 8 feet wide, so it looks intentional rather than improvised.
- For indoor shows, clamp lights or small LED spotlights on your hero display add contrast where venue lighting is often flat and overhead.
- For outdoor shows, battery-powered LED strips along your canopy frame keep colors visible into early evening and on overcast days.
Consistency matters here more than cleverness. The same fonts, colors, and logo placement across your banner, tags, and bags build recognition faster than a one-off clever sign.
Shopper flow and where checkout actually belongs
Most shoppers at a market scan right to left as they walk, a habit carried over from how we read. Placing your strongest sellers and any live demo on the right side of your booth as shoppers approach catches that sightline first.
- Greet shoppers within the first few seconds of eye contact, a simple "happy to answer any questions" works better than a hard sell.
- Position checkout toward the back or side of the booth, visible enough to feel secure but out of the main walking path so it doesn't create a bottleneck.
- If you have help, assign one person to greet and demonstrate while the other handles checkout, so the flow never stalls on a single person doing both.
Avoid placing checkout directly at the entrance. It turns your booth into a single-file line and blocks shoppers who just want to look. A checkout tucked to the side keeps browsing open while still letting you watch your card reader and cash box.
Safety and compliance basics before you open
Event organizers check a short list of things before letting any booth open, and a canopy that isn't properly weighted is usually first.
- Attach ballast weights to the canopy frame using straps, never just resting them on the feet of the legs, since a gust of wind can slide unsecured weights clear off the structure.
- Confirm whether staking is allowed at your site. Many outdoor venues prohibit staking into pavement and require ballast instead, a detail GES exhibiting guidance outlines for temporary outdoor structures.
- Larger tents or structures sometimes require a formal staking plan, a permit, or an engineer-signed truss plan, depending on the venue and structure size, per the same GES exhibiting guidance.
- Some facilities prohibit drilling into concrete entirely and require any approved anchoring to be restored afterward, so check with your event organizer before you assume staking is an option.
- If you're running any electrical equipment or a generator, confirm the show's rules on cord management and placement, since tripping hazards are one of the most common reasons organizers flag a booth during walkthroughs.
None of this takes more than a phone call to your event organizer ahead of time, and it's the difference between a smooth open and a last-minute scramble to find sandbags.
Your event-day checklist and setup timeline
A good checklist means you're never standing in a parking lot realizing you forgot your card reader. Group everything into six categories: structure (canopy, weights, tables, chairs), display (shelving, risers, signage, backdrop), POS (card reader, cash box, bags, receipt pad), lighting (strips, clamp lights, extension cord, batteries), consumables (tape, zip ties, scissors, cleaning wipes), and paperwork (vendor permit, event confirmation, your application photos in case anyone asks).
- Arrival (0 minutes): Unload structure items first, canopy and weights, so the frame can go up while you unpack everything else.
- 30-minute mark: Canopy should be up and anchored. Start placing tables and shelving according to your template.
- 60-minute mark: Display should be fully stocked and priced, signage hung, lighting tested.
- 90-minute mark: Do a soft-open walk-around from the aisle, exactly where a shopper would stand, to catch anything that looks crooked, empty, or blocked.
Keep a small fix-it kit on hand for common hiccups: a spare shelf bracket, a few charged batteries for your lights, and your phone's hotspot as backup if your card reader loses signal.
Pro Tip: Pack your most-used items last so they come off the truck or car first, saving real time during that first 30-minute window.
Vendor photos that win applications and drive sales
Many event organizers ask for a specific set of booth photos when reviewing applications, and a polished set can be the difference between a yes and a maybe. The Eventeny vendor-photo checklist outlines ten shots vendors should have ready: a wide shot of the full booth, an approach-angle shot showing how it looks from the aisle, a close-up of your hero product, a few close-ups of smaller items, a shot showing signage legibility, you working or demonstrating, a customer interaction if you can stage one naturally, a detail shot of packaging or tags, a nighttime or lit shot if you sell at evening markets, and a behind-the-scenes setup shot.
- Shoot the wide and approach shots from 10 to 15 feet away to replicate what a shopper actually sees.
- Use a friend or family member as a stand-in model for the customer-interaction shot if you don't have a real one on hand.
- Shoot signage photos straight on, in daylight, to prove it reads clearly from a distance.
Live-event attendance has grown, and competition for vendor spots is rising with it: the Eventeny 2025 State of the Festival Report notes attendance up 20% since 2023, which means a stronger photo set matters more every season. For listing your booth or event online, our guide to adult listing photos that pass moderation covers staging tips that carry over directly to market applications.
Test your layout before the event, not during it
Mock your 10x10 footprint at home using painter's tape on the floor, then set up your tables and shelving inside those lines. Photograph it from standing eye level, about 10 feet back, the same distance a shopper would stand. Blocked entries, overcrowded front tables, and awkward gaps all show up clearly in a photo that your eyes skip past in person.
Run a timed drill with whoever's helping you that day: full setup in under 60 minutes, then teardown in the same window. Pack in reverse order of how you'll need things, so your canopy and weights go in last (out first), and your signage and cash box go in last (out first) for teardown, since those are the first and last things you'll touch.
Choosing materials and fabrics for an adult-themed booth
Fabric choice carries more weight in an adult-themed booth than in most markets, since texture and drape often do the selling before a shopper ever touches the product. Opaque, structured fabrics for backdrops and table coverings keep the booth feeling intentional rather than accidental, especially if your product line includes anything delicate or intimate that benefits from a private backdrop rather than an open display.
Choose washable, durable materials for anything shoppers might touch directly, like sample fabrics or demo pieces, since a worn or stained sample undercuts the premium feel you're going for. Velvet, suede, and matte leather read as higher-end under booth lighting than glossy synthetic fabrics, which can look cheap under direct LED light.

For draping and backdrops, a deep solid color (black, deep red, charcoal) photographs better and creates contrast for product close-ups, which matters both in person and for the photos you'll use on your own listings. If you sell through our marketplace alongside market events, our guide to writing a strong Kinkykorner listing covers how fabric and staging choices translate into product photography that converts online.
Privacy and discreet space within your booth
Shoppers browsing adult-themed products often want a beat of privacy before they commit to a purchase or even pick something up. A booth that's fully open on every side can make that moment feel exposed, which costs you sales from otherwise interested shoppers.
A simple fix: use one side panel or a partial fabric divider to create a slightly enclosed corner, even just a few feet, where someone can look closer without feeling like the whole aisle is watching. This doesn't need to be elaborate. A single curtain panel on a tension rod or a strategically placed shelving unit does the job.
Keep any more intimate or detailed product information, sizing guides, material lists, care instructions, available at that quieter spot rather than on the main table, so shoppers don't have to ask sensitive questions in front of a crowd. Staff working that corner should default to a quieter, lower-volume tone and let the shopper lead the conversation rather than narrating every feature unprompted.

Interactive elements that work for adult audiences
Hands-on demonstrations build trust fast, but they need a format that respects both the product and the shopper's comfort level. A scent sample, a fabric swatch to touch, or a short demo of how a product works (with a demo unit, never the item someone will buy) gives shoppers the sensory information they need without creating an uncomfortable moment in a public aisle.
Keep any live demo brief and opt-in. Offer it rather than performing it unprompted, since a shopper who didn't ask to watch a demonstration can feel put on the spot. A simple "want to feel the texture?" invites participation without assuming interest.
Sample materials should be clearly separate from sellable stock, placed in a labeled tray or dish so there's no confusion about what's been touched versus what's new. This matters more in this category than most, since hygiene concerns are front of mind for shoppers considering intimate products.
Talking with customers about adult products
The right tone at an adult-themed booth is matter-of-fact, not clinical and not performative. Shoppers respond best when you describe materials, sizing, and use the same way you'd describe any well-made product: clearly, without euphemism, and without over-explaining.
Let the shopper set the pace. Some want detailed material and care information up front; others just want to browse quietly and ask one or two questions. Open with a simple greeting rather than a pitch, and answer questions directly rather than steering toward a sale too quickly.
Avoid loud or attention-drawing language on signage or in conversation that might make nearby booths or passing families uncomfortable, especially at mixed-audience markets. Match your tone to the room, direct and informative at an adult-focused event, slightly more discreet at a general craft market that happens to welcome your category.
Using tablets and screens safely in your booth
A tablet for checkout or a small screen looping product photos can boost sales, but both need a plan for power and placement. Keep charging cables taped down along table legs, never running loose across the walking path, since a tripped cord is one of the fastest ways to get flagged during a safety walkthrough.
Position any screen or tablet display at an angle visible from the aisle but not directly at eye level with children walking by at family-inclusive markets, a simple courtesy that avoids complaints to organizers. If you're running a slideshow of product images, keep the content consistent with what's visible on your table rather than more explicit than your physical display, so there's no mismatch between what draws someone in and what they actually find.
Battery packs are worth the investment for any outdoor show where outlet access isn't guaranteed. A dead tablet mid-demo costs you the moment you worked to set up.
Checking event rules for adult business presentations
Every market or event sets its own policy on what's permitted for adult-themed vendors, and those rules vary widely between a general craft fair, a dedicated kink or fetish event, and a mixed-audience market. Before you book a spot, confirm directly with the event organizer what's allowed on signage, in sample displays, and in any demonstration you plan to run.
Some venues restrict explicit imagery on banners even if the products themselves are permitted for sale, so it's worth asking specifically about signage content rather than assuming your usual branding is fine. Local regulations can also affect what's sellable at a public event versus a dedicated adult marketplace, so when in doubt, treat the event's own written vendor guidelines as the final word, and follow up with the organizer directly for anything not covered in writing.
What actually matters once the booth is built
We've watched enough booths go up to know the trade-off that trips up most new vendors: density versus speed. A packed table looks impressive in your head and chaotic in the aisle. A booth with breathing room sets up faster, looks more intentional, and lets your best pieces do the talking instead of competing for space.
Our rule for what not to bring: if an item doesn't earn its spot in your top five bestsellers, it stays in the car for next time.
— Prenston
Promote your booth and listings beyond market day
Setting up a great booth gets shoppers through your aisle for one day. A Kinkykorner listing keeps your business visible between events, for vendors and event organizers in the adult and kink space looking for year-round reach.
- Free Listing: a no-cost way to get a basic presence in front of our community.
- Monthly: Refer to the pricing page for current monthly subscription fees for ongoing visibility without a yearly commitment.
- Yearly Premium: Refer to the pricing page for current yearly subscription fees for vendors ready to commit to a full season of exposure.
Browse current plans on our pricing page and see where your booth, event, or service fits among our categories.
FAQ
How much does a vendor booth cost?
Booth costs vary by event, typically covering a space fee set by the organizer plus your own spend on tables, canopy, signage, and display fixtures. There's no single standard figure, so check directly with each event's vendor application for its specific fee.
How do you set up as a vendor at an event?
Start by applying with clear booth photos and a product description, then confirm your space dimensions and any event-specific rules on anchoring, electricity, or signage. On event day, build your structure first, then your display, following a timed checklist so nothing gets left behind.
How many items should you bring for a vendor booth?
There's no fixed number, but a curated front row of three to five bestsellers, backed by a reasonable stock of mid-range and impulse items, tends to convert better than an overcrowded table. Fewer, well-presented options reduce decision fatigue and keep your display looking intentional rather than cluttered.
How long does it take to set up a vendor booth?
Most vendors can build a full 10x10 booth, canopy, display, and signage included, in 60 to 90 minutes with practice. Running a timed drill at home before the event helps you tighten that window and catch any missing pieces ahead of time.